

The POS Ticket Printer app allows you to instantly print scannable QR-coded tickets when a customer makes a purchase via your connected POS system. These tickets are printed on standard receipt paper using supported Star Micronics printers and can be scanned right at the entrance for fast, secure check-ins.
When this app is enabled, you will also see a new option inside the Order Details (on the Orders page) for each order, allowing you to print tickets directly from there in addition to automatic POS printing.
How to Enable POS Ticket Printer #
POS Ticket Printer is available as an app in the App Marketplace. To enable it:
- Go to Add More Tools in the navigation menu of your Event Dashboard.
- Find the POS Ticket Printer app in the App Marketplace and enable it.
Once enabled, the POS Ticket Printer feature will be added to your dashboard for easy access.
Supported Printers #
Currently, we support the following Star receipt printers:
- Star mC-Print3 (LAN or Wi-Fi)
Buy on Amazon. - Star TSP143IV UE (LAN or Wi-Fi)
Buy on Amazon | Buy from Square
These models use 3 1/8 inch (80mm) receipt paper, which is widely available online (including Amazon).
Printer Setup Instructions #
Before adding a printer to TicketsCandy, connect the printer to your network and access its internal settings.
Star TSP143IV UE – Ethernet (LAN) #
If you’re connecting the printer to the internet using an Ethernet cable (LAN), follow these steps:
1. Power On
Press the power switch on the back of the main unit.

2. Open Printer Cover
Push the opening lever (1) to open the printer cover (2).

3. Self-Print Configuration Page
Press the [FEED] button (3) until the POWER LED begins flashing blue (4), and then release it.

When the cover is closed, the printer is reset and self-printing is performed.
Save the printout. You will need information from it during the setup process.
Star TSP143IV UE – Wi-Fi #
If you’re connecting the printer to the internet through Wi-Fi, follow these instructions:
After setup, the printer will self-print its configuration information. Keep this page for the next steps.
Star mC-Print3 – Ethernet (LAN) #
If you’re connecting the printer using an Ethernet cable (LAN), follow these steps:
1. Power On
Hold down the Power button on the right side of the operation panel on the front of the main unit for 1 second or more.

2. Self-Print Configuration Page
While holding down the FEED button (1), press the Power button, and release it (2).
Take your hands off the FEED button when Self-Printing has started.

Save the printout. You will need information from it during the setup process.
Star mC-Print3 – Wi-Fi #
If you’re connecting the printer through Wi-Fi, follow these instructions:
- Wireless Setup Procedure using Mobile Phone
- While the video demonstrates a different model, the process is identical for mC-Print3.
After setup, the printer will self-print its configuration information. Keep this page for the next steps.
Access the Printer Settings #
Once your printer is connected to the internet and you have the configuration printout:
Step 1: Find the Printer IP Address #
On the configuration printout, find the IP Address under the Current IP Parameters Status section.
On a computer or mobile device connected to the same network as the printer:
- Open a browser such as Chrome or Safari.
- Enter the printer’s IP address into the browser address bar. For example:
192.168.86.250. - Press Enter.
This will open the printer’s internal settings panel.

Step 2: Log In to the Printer #
On the printer settings page, find the Login link in the navigation menu.
The default login information is usually displayed nearby. For example:
- Username:
root - Password:
public
Click Login and enter the credentials.
If you’re asked to change the password, create a new password and then log in again.

Step 3: Find the Printer MAC Address #
On the printer settings dashboard, locate the MAC Address.
You will need this address when adding the printer to TicketsCandy.

Add a Printer to Your Event #
Open the POS Ticket Printer app in your TicketsCandy event dashboard.
The app will display a table containing all printers currently connected to the event. If you have not connected any printers yet, the table will be empty.
To connect a new printer, click Add Printer.
A Printer Setup window will appear.
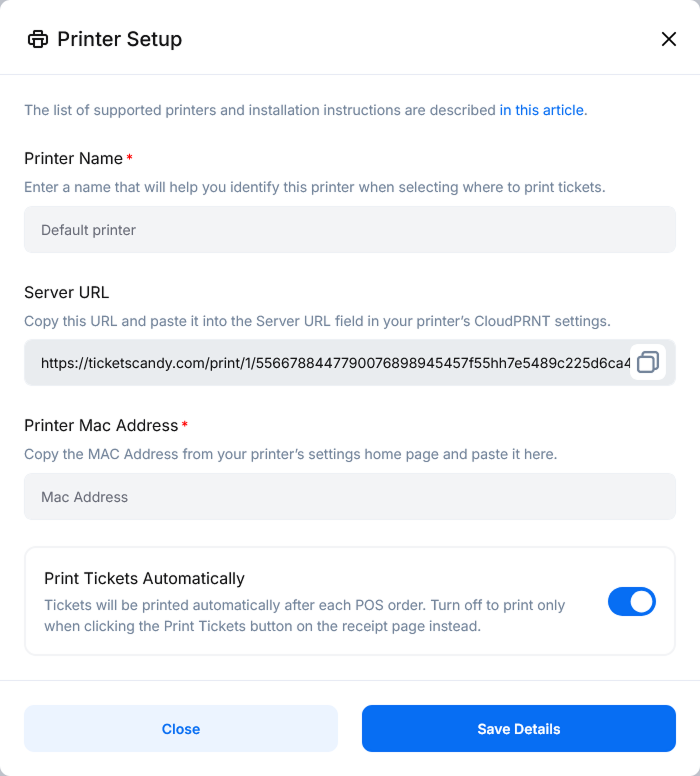
Complete the following fields:
Printer Name #
Enter a name that will help you identify this printer later.
For example:
- Front Entrance
- Main Box Office
- VIP Entrance
This name will appear throughout TicketsCandy whenever you need to select a printer.
Server URL #
TicketsCandy automatically generates a unique Server URL for the printer.
Copy this URL. You will paste it into the printer’s CloudPRNT settings in the next step.
Printer MAC Address #
Copy the MAC Address from your printer’s settings page and paste it into the Printer MAC Address field.
Print Tickets Automatically #
Enable Print Tickets Automatically if you want tickets to print automatically after a completed POS sale whenever this printer is selected as the default printer for that device.
If this option is disabled, tickets will not print immediately after the sale. Instead, a Print Tickets button will appear after the payment is completed so the tickets can be printed manually.
This setting is configured individually for each printer.
Once all details are entered, click Save Details.
The printer will then appear in your printer list.
Configure CloudPRNT #
After creating the printer in TicketsCandy, return to the printer’s internal settings page and open the CloudPRNT section.
Configure the following settings:
- Set CloudPRNT Service to Enable
- Paste the Server URL generated for this printer in TicketsCandy
- Set Polling Time (Sec.) to
1 - Click Submit
The printer will ask you to confirm the changes.
Click Save.
You should see a message similar to:
Please close browser and wait for printer to reboot.
Close the page and wait for the printer to finish rebooting.

Adding Multiple Printers #
You can connect multiple receipt printers to the same event.
Simply return to the POS Ticket Printer app and click Add Printer again for each additional printer.
Each printer receives its own:
- Printer Name
- MAC Address
- Server URL
- Automatic printing setting
There is no need for all POS devices at your event to use the same printer.
For example:
- Computer 1 can use Front Entrance
- Computer 2 can use Main Box Office
- An iPad can use VIP Entrance
Managing Connected Printers #
All connected printers are displayed in the printer table.
The table shows information such as:
- Printer Name
- Date Added
- Printer Status
The printer can display as Online or Offline depending on whether TicketsCandy can currently communicate with it.
Click the three-dot menu next to a printer to access its available actions.
Edit #
Select Edit to change the printer’s settings, including its name or automatic printing preference.
Delete #
Select Delete to remove the printer from your event.
Select a Default Printer for a POS Device #
After connecting multiple printers, you can choose which printer should normally be used by each device running your TicketsCandy POS Box Office.
The default printer selection is saved to the specific browser or device.
This means different POS stations can have different default printers even though they are all selling tickets for the same event.
For example:
- Box Office Computer 1 → Front Entrance Printer
- Box Office Computer 2 → Main Box Office Printer
- Box Office iPad → VIP Entrance Printer
The printer selection is remembered for future sessions on that device.
Set the Default Printer Through POS Settings #
In your event dashboard:
- Go to Sell In Person.
- Open POS Settings.
- Find the Print Ticket section.
- Select the printer you want to use as the default printer for this device.
Tickets from POS Box Office pages opened on that device will use the selected printer regardless of whether the payment is processed using a Square Terminal, Square Stand, Square Reader, or another connected POS device.
Set the Default Printer From the POS Box Office #
You can also change the printer directly from the POS Box Office page.
When the POS Ticket Printer app is enabled, a Printer Settings button appears in the top-right corner of the Box Office page.
Click Printer Settings and select the printer you want to use.
This changes the default printer for the current browser or device.
Select Printer Each Time #
The first option in the default printer dropdown is:
Select printer each time
This is the default setting.
If you leave this option selected, TicketsCandy will ask you which printer should be used whenever you manually print tickets.
This is useful if the same POS device regularly needs to print tickets to different printers.
If one POS station normally uses the same receipt printer, selecting a specific default printer will make the process faster.
How Automatic Printing Works #
Automatic printing depends on two settings:
- A default printer must be selected for the current POS device.
- Print Tickets Automatically must be enabled in that printer’s settings.
When both conditions are met, TicketsCandy will automatically send the tickets to that printer after the POS payment is completed.
For example:
- Computer 1 has Front Entrance selected as its default printer.
- Automatic printing is enabled for Front Entrance.
- A POS sale is completed from Computer 1.
- The tickets automatically print from the Front Entrance printer.
Another computer can have a completely different default printer.
Manually Print Tickets After a POS Sale #
If Print Tickets Automatically is disabled for the selected printer, the tickets will not print immediately after payment.
After the sale is completed, a Print Tickets button will appear on the POS receipt page.
If a Default Printer Is Selected #
Clicking Print Tickets will immediately send the tickets to the default printer saved for that device.
If No Default Printer Is Selected #
If Select printer each time is selected, clicking Print Tickets will open a window asking which connected printer you want to use.
Select the printer from the dropdown and print the tickets.
Printing Tickets From Order Details #
You can also print tickets later from your TicketsCandy admin dashboard.
To do this:
- Go to the Orders page.
- Open the order.
- Click Actions.
- Select Print Tickets.
Because an event can have multiple receipt printers, TicketsCandy will display a popup containing all printers connected to that event.
Select the printer you want to use and send the tickets to it.
This allows you to reprint tickets from any connected receipt printer without changing the default printer used by your POS Box Office device.
Test Your Printer #
After setup is complete, we recommend making a test POS purchase.
- Open your POS Box Office page.
- Confirm that the correct default printer is selected under Printer Settings.
- Complete a POS ticket purchase through your Square-connected device.
- If automatic printing is enabled, the QR-coded tickets should print automatically.
- If automatic printing is disabled, click Print Tickets on the completed order and confirm that the tickets print from the selected printer.
Note: The first time you print tickets to a newly connected printer, there may be a short delay while the printer establishes its connection. Please be patient during the first print. Once the connection has been established, following tickets should print much faster.
Your POS Ticket Printer setup is now ready to use.


